

Ever watched a streamer with live subtitles on screen — translated into other languages in real time? No editor, no translation team; the captions just appear a couple of seconds after they speak. It looks like magic, but you can replicate it at home for free with an open-source tool called jimakuChan.
jimakuChan is a real-time speech recognition subtitle app: it picks up your voice through the microphone, turns it into text, and can even translate it into up to three languages on the fly. This guide walks you through everything from scratch — accessing it, setting up speech recognition and translation, and connecting it to OBS Studio.
What Is jimakuChan and How Does It Work? #
jimakuChan was originally created by a Japanese developer (sayonari) and became very popular among streamers there. V2 Beta (August 2026) is a full rewrite: English UI built in, OBS integration via WebSocket, and zero-install deployment via GitHub Pages.
The mechanics are simple:
- Speech recognition — your microphone audio is converted to text in real time using the Web Speech API built into the browser (Chrome/Edge).
- Translation — the text is translated automatically, up to 3 languages at once. V2 uses the Chrome Translator API (free, no key) as the primary engine, with Google Apps Script as fallback.
- Display — subtitles are shown in a dedicated
overlay.htmlpage, then sent to OBS via obs-websocket v5 as a Browser Source — transparent background, no chroma key needed!
Prerequisites #
| Requirement | Notes |
|---|---|
| Chrome or Edge | The Web Speech API is most reliable here (Firefox is not supported) |
| A microphone | You know, for the talking part 😄 |
| OBS Studio | v28+ for WebSocket method (recommended); older versions still work with Window Capture |
https://sayonari.github.io/jimakuChan/v2/) runs entirely in the browser. Python is only needed for local development.
Step 1 — Access jimakuChan #
Option A: GitHub Pages (easiest — recommended) #
Open this URL directly in your browser:
https://sayonari.github.io/jimakuChan/v2/
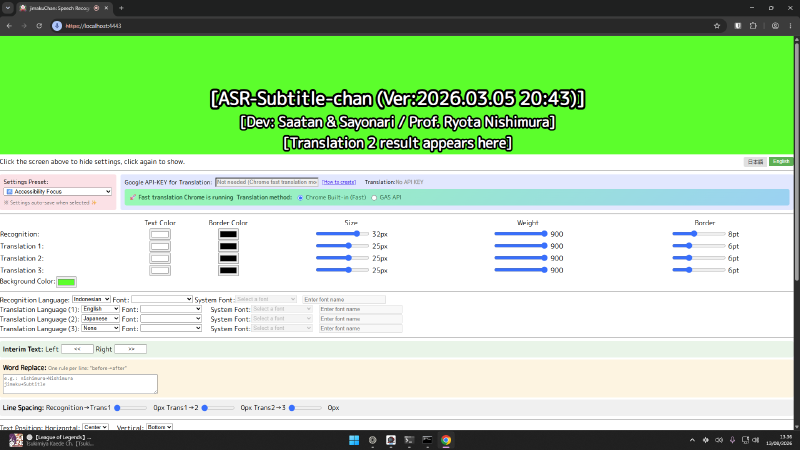
No install, no clone, no Python. Just open in Chrome, allow the microphone, and you’re good to go. This is the latest V2 with English UI and OBS WebSocket integration.
Option B: Local Development (optional) #
If you prefer running locally (for development or offline use):
git clone https://github.com/sayonari/jimakuChan.git
cd jimakuChan
python run_server.py
Open https://localhost:4443/v2/ in Chrome. You’ll see a certificate warning (self-signed) — click Advanced → Proceed to localhost (unsafe).
When the page opens, Chrome will ask for microphone permission — click Allow. Now speak: your subtitles should appear in the preview at the top!
Step 2 — Get Familiar with the Interface #
V2 separates settings and display into two pages:
- Settings page (
index.html) — all options here: language, text size, colors, timers, themes, and more. - Overlay subtitle (
overlay.html) — display-only page that shows the subtitles. This is what gets sent to OBS.
Step 3 — Set Up Speech Recognition #
- Pick your spoken language from the Recognition language dropdown (default is Japanese — change it to yours).
- Talk — if text shows up in the preview, recognition is working.
- A few extras worth knowing:
- Custom dictionary — register terms and names so recognition gets them right.
- Sensitive word filtering — automatically blocks words you don’t want on stream.
- Priority recognition — a hidden feature (unlock via the 🔓 section): add words that are often misheard together with their reading, so recognition prioritizes them.
Step 4 — Set Up Automatic Translation #
V2 gives you two translation methods:
Method A: Chrome Translator API (default — easiest) #
Chrome 138+ ships with a built-in AI translation engine. V2 detects it automatically and uses it as the primary method — zero configuration, zero API keys, free. If your browser supports it, translations start working the moment you begin recognition.
Method B: Google Apps Script (GAS) — fallback #
On Edge, older Chrome, or as a backup:
- Go to https://script.google.com → New project.
- Replace the default code with:
function doGet(e) {
  var text = e.parameter.text || '';
  var source = e.parameter.source || 'auto';
  var target = e.parameter.target || 'en';
  var result = LanguageApp.translate(text, source, target);
  return ContentService.createTextOutput(JSON.stringify({ translatedText: result }));
}- Click Deploy → New deployment → Web app: Execute as
Me, accessAnyone. - Copy the deployment URL, paste only the ID part (
AKfycbXXXXXXXX) into the GAS Key field. - Set Translation 1–3 to your target languages, then speak to test.
Step 5 — Set It Up in OBS Studio (The Core of This Guide) #
V2 offers two methods for getting subtitles into OBS. Pick the one that fits your setup:
Method A: OBS Browser Source via WebSocket (recommended — new in V2!) #
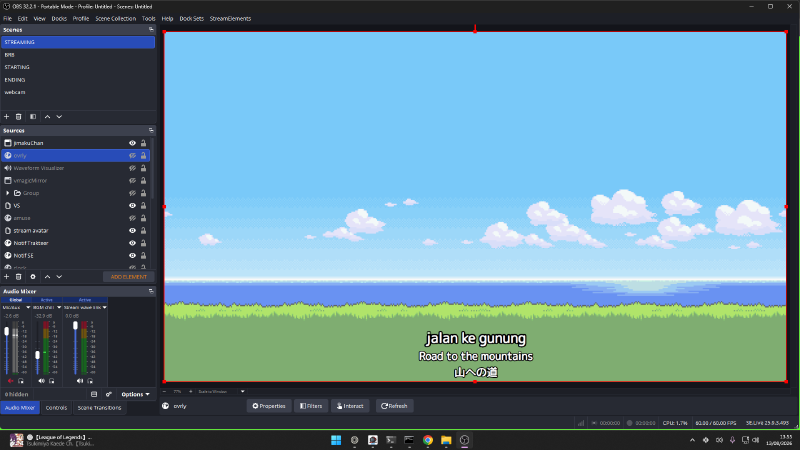
V2’s headline feature: subtitle overlay sent directly to OBS via obs-websocket v5. No Window Capture, no Chroma Key, no cropping. Background is transparent out of the box.
Steps:
-
Enable WebSocket in OBS:
- OBS → Tools → WebSocket Server Settings
- Check Enable WebSocket server
- Note the Password (or check “Allow connection without authentication”)
-
Connect from jimakuChan:
- In the jimakuChan settings page, enter the WebSocket Password
- Click “OBSに接続” (Connect to OBS)
- The button turns green on success
-
Add subtitles to your scene:
- Click “現在の.sceneに字幕を追加” (Add subtitles to current scene)
- A Browser Source named “jimakuChan” is added to the active scene automatically!
Done! Subtitles appear in OBS with a transparent background. No chroma key, no cropping, no disabling hardware acceleration.
Method B: Window Capture + Chroma Key (legacy — for older OBS) #
If your OBS is pre-v28 or you prefer the traditional approach, use Display Mode:
- In jimakuChan, click “表示モード” (Display Mode) — settings panel hides, subtitles only
- OBS → Sources → + → Window Capture → pick the Chrome jimakuChan window
- Crop unwanted areas (tabs, scrollbar) — hold Alt + drag red handles
- Right-click source → Filters → + → Chroma Key → Green (0,255,0), opacity 1.0000
This is identical to the v1 workflow — it works, just more manual.
Final Result #
Extra Tips & Tricks #
- Subtitles lag during fullscreen games? Chrome throttles background tabs. V2’s “Save & Launch” tab generates
.bat/.commandfiles that open the subtitle page in a dedicated Chrome profile — no throttling. - Use the display themes. V2 ships with 5 themes (Outline, Box, Neon, Shadow, Pill) plus 11 presets. Tweak font, size, text and stroke colors so captions match your stream’s look.
- Configure the timers. You control how long text stays on screen before clearing — with independent timers for recognition and translation.
- Try Bouyomi-chan — an optional text-to-speech integration (WebSocket) that reads the subtitles aloud. Fun to experiment with.
- Save & load settings. V2 can export/import all presets as a JSON file — great for migrating to another PC or sharing with friends.
- Love free AI tools? Check out our Free AI Models roundup for more free LLM APIs to play with on other projects.
FAQ #
Can I use OBS BrowserSource directly? In V2, yes! V2 uses obs-websocket v5 to send subtitles to OBS — transparent background, no Window Capture or Chroma Key needed. This is the recommended method.
Does the legacy method (Window Capture + Chroma Key) still work? Yes. V2 still supports it via Display Mode — enable it in jimakuChan, then Window Capture as usual. Good for older OBS versions.
Do I need to install Python?
Not if you use GitHub Pages (https://sayonari.github.io/jimakuChan/v2/). Python is only needed for local development.
Can I use a browser other than Chrome? Edge generally works. Firefox does not — its Web Speech API support is missing.
Do I need a paid API key? No. The Chrome Translator API is free with no key (Chrome 138+), and the GAS proxy is also free with a regular Google account (subject to a daily quota).
Can I translate into more than one language? Yes — up to 3 languages at once (Translation 1–3).
Does OBS need a special microphone source for this? No. The audio is captured directly by Chrome (the Web Speech API) — OBS doesn’t need to route your mic. Just make sure microphone permission in Chrome is set to Allow.
Is the English fork still relevant? The fork (zarvelionzynji/jimakuChan) is now abandoned — upstream V2 includes everything the fork added (English UI, WebSocket OBS, Chrome Translation API). Use the original sayonari/jimakuChan instead.
Troubleshooting #
| Symptom | Cause | Fix |
|---|---|---|
| Microphone permission denied | Chrome doesn’t have mic access | Check the mic icon in the address bar; make sure the page is served over https:// |
| Recognition doesn’t start | Unsupported browser (Firefox) / server down | Use Chrome/Edge; for local, verify python run_server.py is running |
| OBS WebSocket fails to connect | Wrong password / WebSocket not enabled | Check Tools → WebSocket Server Settings; verify the password matches |
| Browser Source doesn’t appear in OBS | OBS version too old (pre-v28) | Update OBS, or use the Window Capture method (Display Mode) |
| Green background still visible (Window Capture method) | Chroma key not set up or wrong | Apply Chroma Key filter: Green (0,255,0), opacity 1.0000 |
| Colors look wrong (Window Capture method) | Capture running in HDR mode | Tick Force SDR in the Window Capture properties |
| Translation stuck on “Wait” | GAS deployment failing / wrong key | Open the deployment URL directly (expect JSON); check Who has access; make sure only the ID is pasted |
| Translation quota exhausted | Daily GAS cap reached | Switch to another Google account; or use Chrome Translator API (free) |
| Subtitles lag during fullscreen games | Chrome throttles background tabs | Use the .bat/.command file from the “Save & Launch” tab (dedicated Chrome profile) |
| “OBS only subtitles don’t disappear” (V2 known issue) | obs-websocket emit_event goes through libobs obs_data — string/object arrays become empty | V2 fixes this by bundling json: JSON.stringify(msg) — update to latest V2 if you hit this |
| Display Mode doesn’t activate on URL open | Mode remembered per URL, possibly different URL | Make sure the URL matches exactly; press Esc to toggle back to settings |
Wrapping Up #
That’s it — jimakuChan V2 is a powerful tool for streamers: real-time subtitles for accessibility (a genuine lifeline for deaf viewers), plus automatic translation to reach an international audience. With V2, setup is as easy as opening a browser and connecting to OBS — everything free and open source.
If this guide helped you:
- ⭐ Star jimakuChan on GitHub,
- 💬 Drop a comment if you hit a snag or want another OBS tutorial,
- 🔁 Share it with a fellow streamer who needs it.
Happy streaming! 🚀
![[Streaming Guide] Advanced Troubleshooting & Debugging](/thumb1_hu_cab774f6dd7a73d6.png)